| ||
|
|
Overview
Note: This feature is only available in ProblemTracker Enterprise Edition.
Alerts are a form of email notification messages that can be triggered by a lack of change in a record's state within a certain time period. For example, a problem record should not stay within a particular state for longer than 2 days. An alert can be sent if the record is still within the same state after a period of 2 days has passed. Alerts can also be used to remind a user about a record at a later date and time.
Alerts can be configured per record. Each record can have different alert settings including when, how, how often, and to whom the alerts should be sent.
Alerts can also be configured for each transition in the workflow. With the necessary privileges, users can override these alert settings when moving a record to another state using the task operation.
When specifying when to send an alert either for a given record or a transition, a fixed date and time can be entered or a date and time based on a date field within the record can be used. In addition, alerts can be sent once or configured to repeat periodically. Any combination of users and / or user groups can receive alerts for a particular record.
Enabling the Alerts Feature
Performing the following steps will allow you to enable the Alerts feature in your workgroup:
Enter the Alerts license key in the License Manager
A license key is required to present in the
License Manager in order
to use the Alerts feature.
Enable Alerts in the General Preferences section
Login to the workgroup as Admin, then click on the Admin icon in the
top button bar. Click on the General Preferences button, then in the
"General Options" section set "Enable Alerts Function" to "Yes".
Click OK to save this change
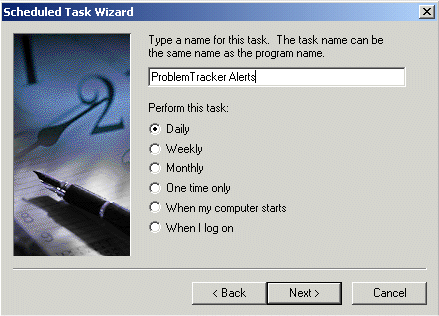
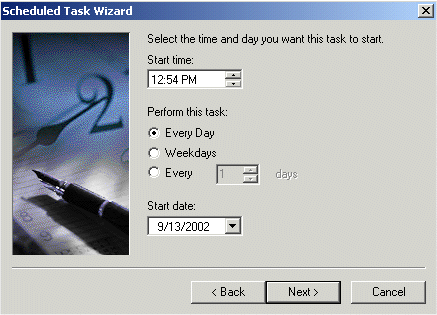
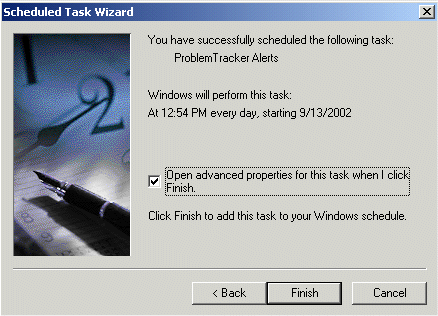
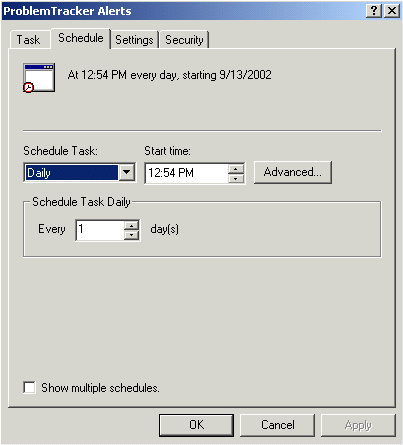
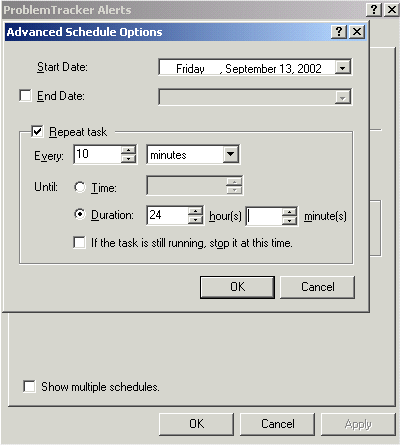
Create a Scheduled Task for the Alerts Feature
Alerts must be configured in the Scheduled Tasks section of the Control
Panel on your ProblemTracker server. To create this scheduled
task, perform the following steps:
Configure SMTP Mail Server for use with Alerts
An SMTP mail server is required to generate the alert notification
messages. This can be configured in the
Email Configuration section.
Ensure an email address is entered for the users that will receive alerts
A valid email address is required for a user to receive alerts. Email addresses
are entered in a user's profile in the
Workgroup Management System.
After enabling the Alerts feature using the steps above, configure the user group privileges and default settings for Alerts as described below.
Alerts User Group Privileges
The following are the user group privileges related to the Alerts feature. These privileges can be set in the User Group Privileges page of the User Administration section. These privileges will only be displayed in the Privileges page if Alerts has been enabled using the steps in the section above.
Configuring Default Alerts Settings per Product
Default alert settings can be configured per product. These default settings will be used when a record is added to ProblemTracker. To configure default alert settings per product:
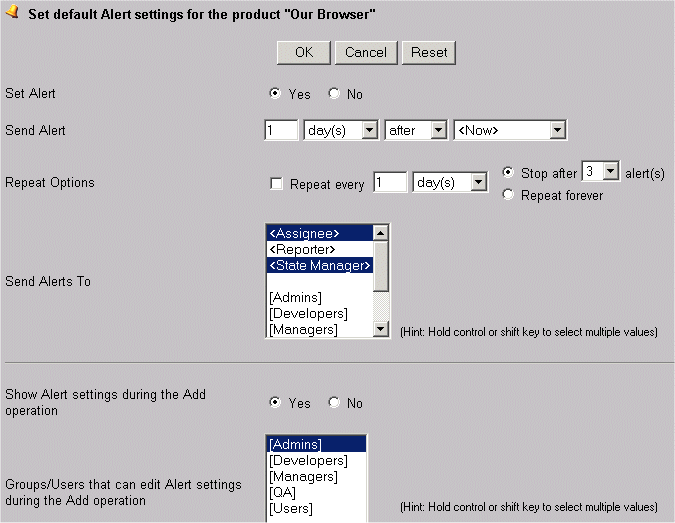
If a date field is selected as the date to generate an alert and this date field has no value in a record, an alert will not be generated. If a date field is selected as the date to generate an alert and this date field is later removed from the record (moved from the "In Use" to "Not In Use" column in the Define Record section, then <Now> will be set as the date to generate an alert (to replace the date field that was removed).
Configuring Default Alert Settings for Transitions
Default alert settings can be configured for each transition in your workflow. These default settings will be used when a record is added to ProblemTracker. To configure default alert settings for a transition:
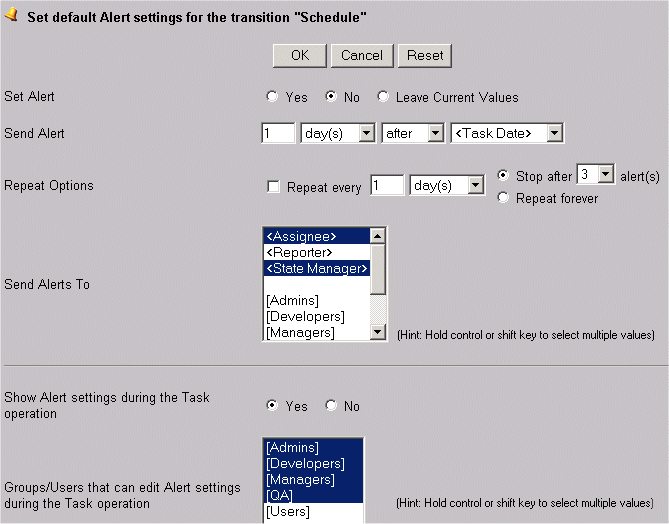
If a date field is selected as the date to generate an alert and this date field has no value in a record, an alert will not be generated. If a date field is selected as the date to generate an alert and this date field is later removed from the record (moved from the "In Use" to "Not In Use" column in the Define Record section, then <Task Date> will be set as the date to generate an alert (to replace the date field that was removed).
Configuring Alert Settings during Add Operation
When a record is added, the reporter may be prompted to configure alert settings depending on the default alert settings for the product selected in the record (setting the default alert settings for a product are defined in the Configure Default Alert Settings per Product section above.
In order for the user to view the alert settings when adding a new record, the product selected in the record must have "Show Alert Settings during Add Operation" set to "Yes" and the user must be a member of a group with the privilege "View Alerts Settings". On the Add page, the user meeting the criteria mentioned above will see the "Set Alert" field with a check box. Checking the box will allow the user to view the alert settings. When the user clicks OK to add a new record, the alert settings will be displayed, but cannot be modified. The "Additional Information" field can be modified to add a note or other information to be included in the alert notification message. Click OK to save the information entered.
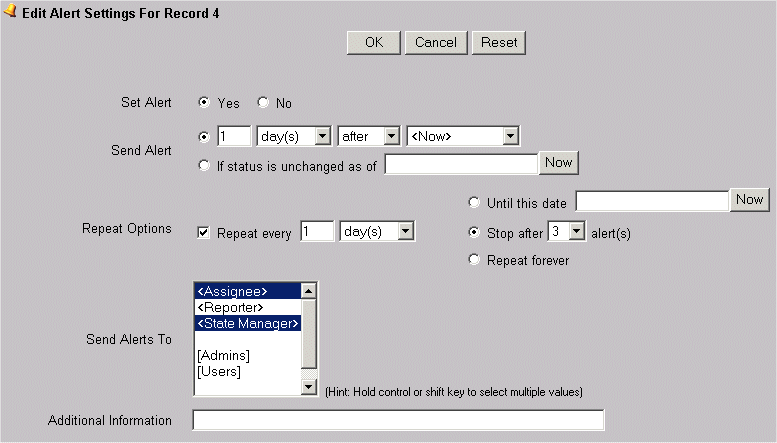
For a user to edit the alert settings when adding a new record, the product selected in the record must have "Show Alert Settings during Add Operation" set to "Yes" and the user (or a group of which the user is a member) must be specified in "Groups / Users that can edit Alert Settings during the Add operation". On the Add page, the user meeting the criteria mentioned above will see the "Set Alert" field with a check box. Checking the box will allow the user to edit the alert settings. When the user clicks "Add" or "Add & Copy" to add a new record, the alert settings will be displayed. The user can modify the following settings with respect to alerts. By default, the values displayed here will be the values selected in the Default Alert Settings for the product selected in the record.
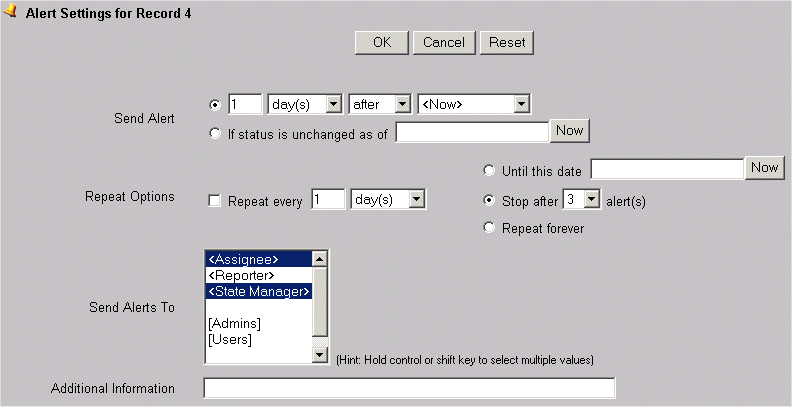
Configuring Alert Settings during Task Operation
When the task operation is performed on a record, the user may be prompted to configure alert settings depending on the default alert settings for the transition selected (setting the default alert settings for a transition are defined in the Configure Default Alert Settings per Transition section above.
In order for the user to view the alert settings when performing the task operation for a record, the transition selected must have "Show Alert Settings during Task Operation" set to "Yes" and the user must be a member of a group with the privilege "View Alerts Settings". After selecting a transition during the task operation, the user meeting the criteria mentioned above will be able to see the alert settings section, but cannot modify the values. The "Additional Information" field can be modified to add a note or other information to be included in the alert notification message. Click OK to complete the task operation.
For a user to edit the alert settings during the task operation, the transition selected must have "Show Alert Settings during Task Operation" set to "Yes" and the user (or a group of which the user is a member) must be specified in "Groups / Users that can edit Alert Settings during the Task operation". After selecting a transition, the user meeting the criteria mentioned above will see the alert settings section. The user can modify the following alert settings. By default, the values displayed here will be the values selected in the Default Alert Settings for the transition selected.
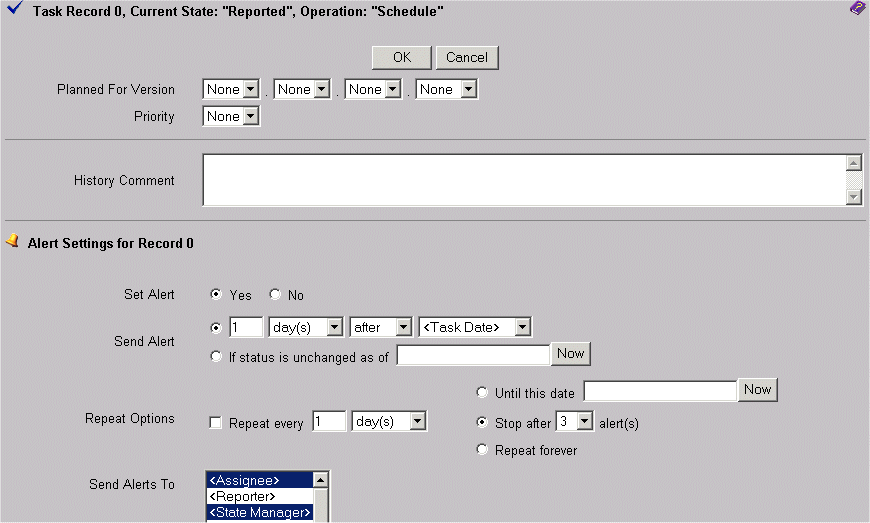
Editing Alert Settings
A user can edit the alert settings for a record if they have the required privileges. If a user is a member of a group with the "Edit Own Alerts" privilege, the user can modify the alert settings for a record in which they are the Assignee. If a user is a member of a group with the "Edit Alert Settings" privilege, the user can modify the alert settings for any record.
A user meeting the criteria mentioned above can edit the alert settings for a record by clicking on the Edit icon in the top button bar and entering a record number or by clicking on the Edit icon next to a record number in a report on the Query or Home page. Clicking on the Edit Alerts button will display the following alert settings for the record:
