| ||
|
|
 Before attempting to upgrade a workgroup from a previous version
in the 4.x series to 5.0.1, it is strongly recommended that
you make a backup of your database.
Before attempting to upgrade a workgroup from a previous version
in the 4.x series to 5.0.1, it is strongly recommended that
you make a backup of your database.
In addition, if you have manually applied any custom security to your workgroups (such as file system permissions or IIS application settings), you will need to re-apply these changes to this workgroup after it is upgraded to the latest version. A Web Server Security Overview can be found in the Installation Help Guide.
This option should only be used to upgrade workgroups in the 4.x or 5.x series. To upgrade a version 3.x workgroup, please review the Version 3.x Upgrade section.
It is recommended that you enter your license keys prior to upgrading your workgroups. If the users in the workgroup you are upgrading are of a license type that does not correspond to your license keys, a warning will be displayed during the upgrade process. For example, if you are upgrading a workgroup that contains users with license type set to "Floating", but you do not have a "Floating" license key entered for the latest version, you will receive a warning message. Even though you are prompted with the warning message, you will still be able to complete the upgrade process. However, your users will not be able to login to the workgroup until the proper license key(s) have been entered or the license type has been changed for the user(s). For information on changing the license type of a user, please use the Edit a User operation after you have successfully upgraded the workgroup.
To upgrade a workgroup from a version in the 4.x or 5.x series to version 5.0.1, click on the Admin button on the Button Bar, Select the option "Upgrade Workgroups from previous 4.x version to ProblemTracker 5.0.1". Select a workgroup from the pulldown menu, then click on the Upgrade Workgroup button. A confirmation page will be displayed confirming that the workgroup files have been upgraded. Click on the Continue button to proceed with upgrading the data for the workgroup.
Another confirmation page will be displayed listing several areas of your
database that need a time zone selection. Select a time zone for each these
areas. The time zone you select can be different from the time zone you
selected for your ProblemTracker server during the Version 5.0.1 installation setup.
For a list of available time zones in your operating system, please refer to one of the following sections:
Windows 2000 and Windows XP Time Zones
Windows NT 4.0 Time Zones
Click on the Upgrade Data button to proceed, then click OK to confirm.
Upgrade Users from 4.x to 5.0.1 After the data has been upgraded successfully, a confirmation page will be displayed. You will be prompted to upgrade your users. In Version 5.0.1, users for all workgroups are added and maintained in the License Administration section. When upgrading a workgroup from Version 4.x to 5.0.1, each user must be upgraded so that the user account can be maintained using the License Administration section. Click on the Upgrade Users button to proceed.
If there are conflicts present in your user accounts, you will be prompted to resolve these conflicts before you can proceed with upgrading your users. A user conflict can occur if you have a user id present in multiple workgroups with different profile information. For example, if you have a user account called dev_mgr which is present in 2 workgroups, but this user account has a different Name and Email Address in each workgroup (as shown in the image below). You will need to choose which information will be associated with this user for both workgroups.

After clicking on the "Upgrade Users" button, if there any user conflicts, a page similar to the image below will be displayed.
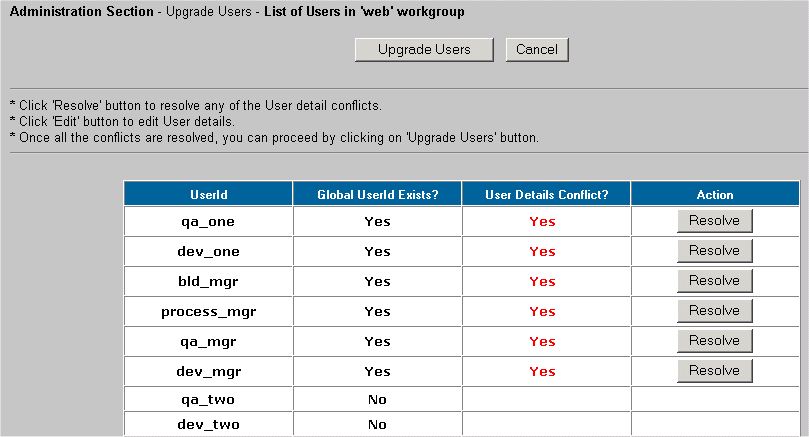
Users with "Yes" displayed in the "User Details Conflict?" column need to be resolved before you can continue with the upgrade. Click on the "Resolve" button in the "Action" column of each user id to resolve the conflict. On the next page, details of the user conflict will be displayed. The first column "Existing User Details" shows the user profile information already present for this user account in the License Administration section (this information could be present if you already upgraded another workgroup that contained a user account with the same user id). The second column "Workgroup User Details" contains the user profile information for this user id present in the workgroup you are attempting to upgrade. To resolve the user conflict:
OR
OR
After making your selection and / or entering the user details in the "Resolved User Details" column, click on the Update button. Click on the "Resolve" button for another user to continue resolving the conflicts.
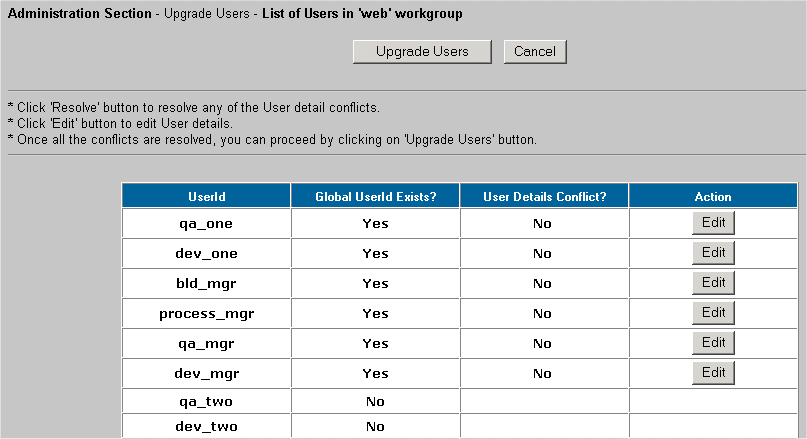
Users with "No" displayed in the "User Details Conflict?" column do not have a conflict present. If you wish to modify the profile information for a user which had a conflict resolved, click on the "Edit" button displayed in the "Action" column for the user account, modify the profile information in the "Resolved User Details" column, then click Update to save your changes.
Once all users have "No" listed in the "User Details Conflict?" column and there are no longer any "Resolve" buttons in the "Action" column (as shown in the image below), you can proceed with the upgrade process by clicking on the "Upgrade Users" button. A confirmation will be displayed when the user upgrade process is complete.
Click on the Home icon to return to the Workgroup Management System Home Page. Your upgraded workgroup will now be displayed on the list of workgroups on the Home Page. To login to your upgraded workgroup, click on the key icon to the left of the name of your upgraded workgroup. A separate window will be launched with the workgroup's login page.
Editing a User Profile during the Upgrade Users operation
When the Edit button is present in the Action column during the process of upgrading users, you can click on the Edit button to make changes to a user's profile. The Edit button will not be displayed for any users which did not have a user conflict. You can only edit users without conflicts after the "Upgrade Users" operation is complete by using the Edit User option in the License Administration section. After clicking on the "Edit" button in the "Action" column of a user, you can select one of the following options to make changes to the user:
OR
OR
 NetResults ProblemTracker

