| ||
|
|
Note: This feature is included in ProblemTracker Enterprise Edition and as a separately purchased option for ProblemTracker. If you have not entered the Inet Page license key, this feature will not appear in your system.
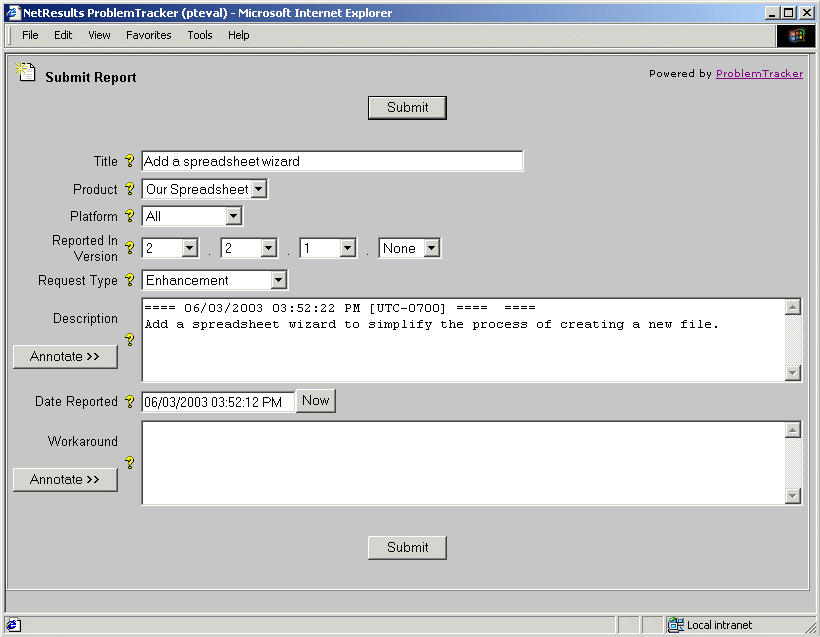
The Inet Page is a form used to anonymously submit records to ProblemTracker. After submitting a record, the user is provided with the record number of the newly added record by ProblemTracker. The Inet Page can be used, for example, as a web based suggestion box.
A user who submits a record through the Inet page is not required to login to ProblemTracker. However, since the user does not have a user account, they will not be identified in the record (Reporter field will be set to Internet User), will not receive email notifications from ProblemTracker, can not log in to ProblemTracker to view the status of the issue they reported, and can not have issues assigned back to them for verification (e.g. to sign off on the resolution of the issue). To have access to those features, the user must have a ProblemTracker user account, login to ProblemTracker, and submit the issue via the Add page.
A sample Inet Page is displayed below.

To set up the Inet Page for use by external users, perform the following steps:
Enter the Inet Page license key into the License Manager
You must enter a license key into the
License Manager in order
to use the Inet Page feature.
Enable the Inet Page in the General Preferences section
Customize the Inet Page Options
Customize the fields displayed on the Inet Page
Certain fields are displayed on the Inet Page by default. Browse
to the Inet Page to see which fields are currently displayed by going to
http://servername/workgroupname/internet/user_add.asp
where servername is the TCP/IP host name of the machine where ProblemTracker is installed and workgroupname is the name the workgroup you are trying to access. For example, to reach the workgroup called pteval installed on the server called myServer, you would browse to
http://myServer/pteval/internet/user_add.asp
To change whether a field is displayed on the Inet Page:
Check the value of the Record Order option for this field. This field determines the order in which the fields are displayed on the Add and Inet Pages.
Check the setting of the option Required for Add. If this option is set to "Yes", this field will also be require a user to enter a value for this field when submitting a record via the Inet Page.
To create a new field to be displayed on the Inet Page, use the information in the Customizing the Data Record section.
Customize the pulldown options displayed on the Inet Page
For the pulldown fields displayed on the Inet Page, you can limit
the option menu values available for selection. For example,
if a pulldown field called Priority is displayed on the Inet Page
and you do not want Inet Page users to select the value
"1", you can set the value such that it is not displayed in the
Priority field on the Inet Page.
To set whether a pulldown option menu item is displayed on the Inet Page:
If desired, apply web security to your ProblemTracker
installation
You can use the user
authentication provided by your web server to limit
access to the rest of your ProblemTracker installation.
Review the information in the
Web Server Security
section for information on applying standard web server security to
your ProblemTracker installation.
Once you have enabled the Inet Page using the steps above, your users can browse to this page by going to
http://servername/workgroupname/internet/user_add.asp
where servername is the TCP/IP host name of the machine where ProblemTracker is installed and workgroupname is the name the workgroup you are trying to access. For example, to reach the workgroup called pteval installed on the server called myServer, you would browse to
http://myServer/pteval/internet/user_add.asp
To submit a record using the Inet Page:
 )
is present, you can move the cursor over the icon to
see a description of the field.
Records submitted via the Inet Page have a few differences when compared to records submitted via the Add Page:
Reported By field
All problems reported using the Inet Page are filed as having been
reported by a special built-in user named Inet so
that you can quickly identify (or search for) problems reported
using the Inet Page.
Transitions where New Assignee is the Reporter
If a transition has New Assignee set to be the Reporter of a record,
when this transition is selected for a record reported via the Inet page
the record will be routed to the State Manager of the New State rather
than the Reporter (since records cannot be assigned to the
user called Inet listed as the Reporter). For more information about
transitions, please review the
Workflow Transitions
section.