| ||
|
|
Log In Process
 To use ProblemTracker you must log into the system.
Start your web browser and go to the following URL:
To use ProblemTracker you must log into the system.
Start your web browser and go to the following URL:
http://servername/workgroup/ptlogin.asp
where servername is the TCP/IP name of the host where the ProblemTracker server software is installed, and workgroup is the name of the of the ProblemTracker workgroup (e.g. "pteval") you wish to access. If you are not sure where ProblemTracker was installed on your network, please ask your ProblemTracker Administrator.
You will be presented with the login screen. Enter your username and password to log in or, if available, click on the link New User? Register Here. Details on creating your own account by Self Registration can be found in the User Accounts Help section.
On occasion when logging in, you may encounter the error message, "Login Failed - Your previous login session is still active." This message can come up if you were previously logged in to ProblemTracker, but did not click the Logoff icon to finish your session. Select Yes so that the previous session will be closed and a new session will begin and allow you to login. If you select No, you will not be able to login to ProblemTracker.
If you are using floating licenses, it is important that you click the Logoff icon to end your ProblemTracker session when you are done. Simply exiting your browser will not end your session and may prevent other users from being able to access ProblemTracker. If you do forget to click the Logoff icon, simply login in again, answer Yes when asked to delete your old session, and then click the Logoff icon on the Home page when it is displayed.
If you browse off to another site without clicking the Logoff icon to end your ProblemTracker session, you can click the Back button on your browser several times to return to the last ProblemTracker page you were on and then click the Logoff icon. Or, you can simply browse back to the login page, login again, then click the Logoff icon on the Home page when it is displayed. ProblemTracker does not allow more than one active session per user account (irrespective of license type), so if you login and then logoff you can always be certain that you have not left any active sessions around.
If your user account is of the floating license type, you may encounter the error message, "Login Failed - The maximum number of concurrent logins has been reached. Please try again later or contact your administrator." This message is generated because the maximum number of floating license users are already logged into the system. As soon as another floating license user logs off (or is forced off by your administrator), you will be able to login to ProblemTracker.
If it is important that you are always able to login, please ask your administrator to configure you as a static license user. Static license users have a single license permanently assigned to them.
After logging in, the first screen you will see is your ProblemTracker homepage.
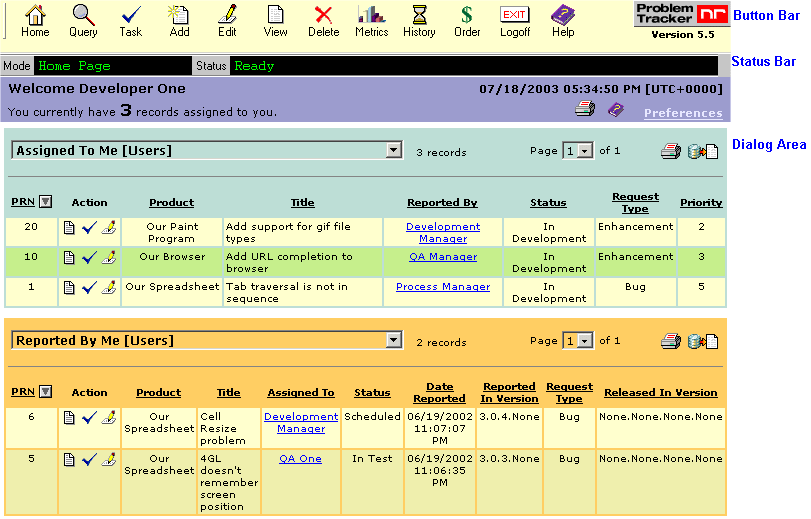
By default, this page has two reports, which display the records assigned to you and the records reported by you. Also present on the Home Page is a link to the personal preferences section, where you can customize various user settings, such as your changing your password and selecting date and report settings. A link to edit your account information may also be displayed depending on the privileges granted to you by your system administrator
Report Layout
You can customize the columns of the reports displayed on your
home page either by creating your own saved report layout or selecting
an existing saved report layout.
Please refer to the section Using Saved
Queries & Reports for details.
Report Query
You can customize the query "Assigned To Me"
with a query of your choice by defining your own personal saved
or advanced query and selecting it for the First Home Page Report field
in the Personal
Preferences page. Alternatively, you can select an existing saved or advanced query
for this
first home page report as well. You can customize the query "Reported
By Me" using the Second Home Page Report field in the Personal Preferences page.
Information on selecting the queries for the Home Page reports via the
Personal Preferences page is described in the section below.
Please refer to the section Using Saved
Queries & Reports for details on how to create your own saved query
or refer to the section Advanced Queries
for information on creating advanced queries.
Dynamic Report Selection
You can view different saved queries or charts on the Home page at any time by
clicking on the pulldown menu above each report. Any saved query or chart
to which you have access will be displayed in the pulldown for selection. To permanently
change the reports displayed on the Home Page when you first log into
ProblemTracker, you will need to select the desired reports in the
Preferences section.
Dynamic Sorting of the Results
You can change the way the reports on the Home page are sorted at any time
by clicking on the field name. The field that is being used as the primary
sort field will have an arrow to the right of the field name. If the arrow is pointing
down, the results are sorted by that field in a descending order. If the arrow is pointing
up, the results are sorted by that field in an ascending order. Clicking once on the field
with the arrow will reverse the sort order. Clicking once on any field that
does not have the arrow will sort the results in ascending order by that field. Any field
except large text fields can be clicked to sort the results by that field.
Other Features of the Home Page
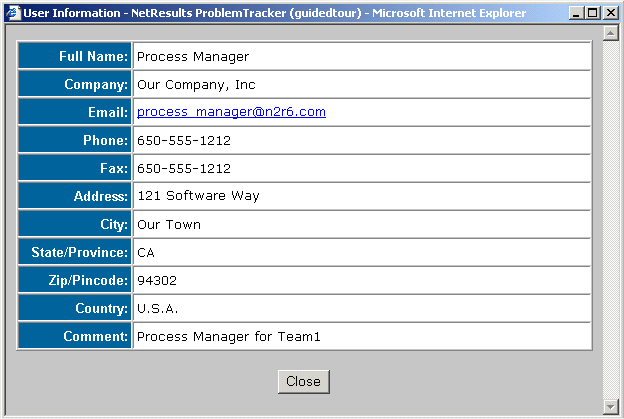
When the Assigned To or Reported By fields are displayed as columns on a Home
Page report, the user's name will appear as a clickable link if you have the appropriate
privilege. Click on the user's name to display the user's profile information as
shown below.
 There is one export icon for each report displayed on the Home Page.
The records displayed in each of the Home Page reports can be exported
to a CSV file
(comma separated values format) by clicking on the export icon
in the upper right corner of the report. You can then open this file with
another tool such as Microsoft Excel or Crystal Reports.
There is one export icon for each report displayed on the Home Page.
The records displayed in each of the Home Page reports can be exported
to a CSV file
(comma separated values format) by clicking on the export icon
in the upper right corner of the report. You can then open this file with
another tool such as Microsoft Excel or Crystal Reports.
If you have exported Metric (chart) data, you can create a chart in Microsoft Excel from the exported data by doing the following. Open the file in Excel and "rubber band" (left-click mouse and drag a rectangle around) the data plus column and row titles (exclude rows 1 through 3, but include the individual row/column titles in row 4 and column A along with the data in your selection) and click the Chart Wizard icon (or select Insert->Chart...). Click the Finish button in the Chart Wizard to accept the Microsoft Excel default settings for the chart; or make selections, click Next button, then click Finish to create a chart with custom settings. Please review the Microsoft Excel Help for further information on Excel charts.
 Multiple print icons may be displayed on the Home Page. The print icon
below the date and time information in the upper right corner of the Home Page
will print the Home Page as it appears in your browser window
(excluding the top button bar that has the action icons such as "Home",
"Add", "Help", etc.). Printing with this icon will include the
"Welcome <User>" message, the date and time, and the records or chart displayed
in each report. When reports are displayed on the Home Page, using
this print icon to print the Home Page will only display the records that appear in
your browser window, but will not print all records in the query results for each report.
Multiple print icons may be displayed on the Home Page. The print icon
below the date and time information in the upper right corner of the Home Page
will print the Home Page as it appears in your browser window
(excluding the top button bar that has the action icons such as "Home",
"Add", "Help", etc.). Printing with this icon will include the
"Welcome <User>" message, the date and time, and the records or chart displayed
in each report. When reports are displayed on the Home Page, using
this print icon to print the Home Page will only display the records that appear in
your browser window, but will not print all records in the query results for each report.
To print the results of a report or chart displayed on the Home Page, click on the print icon in the upper right corner of each Home Page Report. When a report is displayed on the Home Page, clicking on the print icon in the upper right corner of the report will print all of the records that match the Saved Query (including those records not shown on the Home Page when the number of records in the query results exceeds the maximum number of records displayed per page).
Account Info
If you have been granted access to edit your own user account information, a link labeled Account Info will be present in the upper right corner of the Home Page. Click on this link to edit your user account information.
The Edit User Account page allows you to update the contact information stored in ProblemTracker including your email address, phone number, address, etc.
To update your account information, enter information in the fields displayed, then click OK to save your changes.
The contact information that you can update in the Edit User Account page includes:
New Password
To change your password, enter the password you wish to use
in this field.
Confirm New Password
Re-enter the password you typed into the New Password
field above. You
must enter the same password into both of these fields in order to
successfully change your password.
Last Name
Depending on the way your ProblemTracker
has configured the system, your last name may be displayed
in reports on the Home and / or Query pages
when you are listed as the Assignee or Reporter of a record.
First Name
Depending on the way your ProblemTracker
has configured the system, your first name may be displayed
in reports on the Home and / or Query pages
when you are listed as the Assignee or Reporter of a record.
Company
The name of the company or organization you represent
Email
Your email address. This address will be used to send you
email notification,
alerts,
or discussion messages about records
in ProblemTracker.
Phone Number
Fax
Address 1
Address 2
City
State / Province
Zip / Pincode
Country
Comment
Any comment you wish to include in your user account information
From the ProblemTracker home page, click on the link labeled "Preferences".
You can customize the following features:
User Password Settings
The following preferences are used when report data is exported from the ProblemTracker Home, Query, and Metrics pages. Data is exported as a CSV (comma separated values) file. However, because there is no firm definition of a CSV standard, you may need to modify some export parameters to allow use of the exported data by other applications (spreadsheet, database, etc.). ProblemTracker and your ProblemTracker Administrator have set these values to defaults that should work in most environments. So in most cases, you should not need to change these settings. If you have an application that is not importing the data correctly, review the information below. If that does not help, please contact your ProblemTracker Administrator.
Note: When exporting data from a UTF-8 workgroup using the recommended settings listed above, misalignment of the data can occur when viewing the exported data in Excel if the file is not first saved to disk and then opened in one of the two ways listed below. Unfortunately, the default file open in Excel does not properly store multiple line text (as there may be in ProblemTracker BigText fields) in a single cell. Instead, it puts each line in its own cell which results in misalignment of the fields in the spreadsheet.
For UTF-8 data exported with Field Separator set to Tab, Row Separator set to Carriage Return & Line Feed, and File Extension set to txt, you can get Excel to properly place multiple line data in a single cell using one of the two operations below.
Visual SourceSafe Login Settings
Discussion Settings
Note: These options will not be displayed unless you are using
ProblemTracker Enterprise Edition. These
preferences are not available for Restricted Users.
When you log in, you are given access to data and operations as assigned by your ProblemTracker administrator. These rights are assigned to you via User Groups. Each group defines a set of privileges, and you are assigned to groups. The total set of privileges you have is the sum of all the rights of all the User Groups that you are a member of.
Please contact your ProblemTracker administrator if you wish to receive additional privileges.
 NetResults ProblemTracker

